Thursday, June 10, 2010

A New Way to Eat Lasagna

"The ear tests words as the palate tastes food." -Job 34:3

New Chefs has been riding high on the 'learn a new word' and the 'bananas are awesome' themes recently, so for this post I'd like to bring the two together. Introducing...

the Pastelón!

"Heavens to Murgatroyd!" you might be saying. But fear not, readers! The pastelón is your friend. And what a friend it will be...

New Chefs' discovery of pastelón came about when my dear friend Chelsea noticed that plantains were being sold 10 for a dollar at a store in my neighborhood. I was quite hesitant at first. I mean... have you seen what a ripe plantain looks like?!
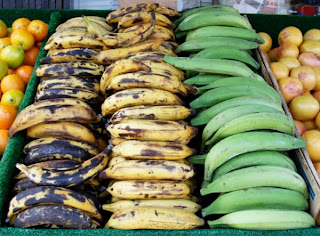
(the ones on the left there)...

Ripe plantains look alarmingly like rotting bananas. Well...Cavendish bananas...since plantains are technically bananas too. And if I had a banana that ripe, I'd be making banana ice cream out of it as a last resort!

Yet as it turns out, when plantains do get this black, they're quite acceptable for cooking- as are the green plantains. It all depends on which flavor you want. When the plantain is green, it's starchy and works well with savory flavors. When the plantain is black, the taste is much sweeter.

So we had an abundance of plantains... (By the way, plantain season runs from May to September, so you'll have an abundance too.) What we decided to do, thanks to a recipe found on Food Gawker, was make pastelón.

The pastelón, in the simplest sense, is like lasagna- but with plantains instead of pasta. Honestly, I would tout this recipe as the best to hit the site yet. This pastelón has such a unique flavor- perhaps because I don't traditionally eat Puerto Rican cuisine. It's sweet...and yet savory...and the colors, oh, the colors! Whatever the case, I insist you give this a try. Other than the plantains, you've probably got most of the ingredients in your kitchen!

---

Pastelón
  • 1 lb ground beef
  • 1 onion, minced
  • 3 cloves garlic, minced
  • 1 small green pepper, minced
  • 1 small orange pepper, minced
  • 1 c chopped cilantro
  • 2 tsp adobo
  • 2 tsp oregano
  • 2 tbsp vinegar
  • 1 envelope sazón seasoning
  • 8 green stuffed olives, quartered
  • 1/2 c raisins
  • 1/4 c diced tomatoes
  • 4 plantains, peeled and sliced into strips (try and get them when they're very black)
  • 3 eggs
  • 2 tbsp milk
  • 2 cups shredded white cheese
  • vegetable oil
Directions:
  1. Pre-heat the oven to 350 degrees F. Butter a 9 x 9 pan with cooking spray or butter.
  2. Mix beef, onion, peppers, garlic, cilantro, adobo, oregano, vinegar, and sazón in a bowl.
  3. In a large skillet over medium-high heat, heat 2 tbsp of olive oil and add meat mixture. Cook the mixture until the beef is brown and the juices bubble clear. Add the olives, raisins, and tomatoes. Mix and simmer for 10 minutes. Remove from heat and set aside.
  4. In a large frying pan, heat up enough vegetable oil to coat the bottom. Fry the plantain slices for about 2-3 minutes on each side, or until they are golden and a bit crispy. Place cooked slices on a plate with paper towel to drain.
  5. Piece together the pastelón in the square pan. First, make a layer of plantains. Cover this with half of the meat mixture, then a fistful of cheese. Make a second layer of plantains and cover with remaining meat mixture. Add another handful of cheese and one final layer of plantains.
  6. Beat eggs and milk together. Pour over the pastelón and give it a minute to soak in. Add more cheese here if you like!
  7. Bake in the oven for 20 minutes and enjoy :)

Wednesday, June 9, 2010

What Are...Curds?

"Little Miss Muffet sat on her tuffet, eating her curds and whey..." -Traditional nursery rhyme

Do you know what curds and whey are?! Because nobody ever really told me, and it was because of a recipe (after the jump) that I learned something new. Read on...


So....I wanted to make a lemon meringue pie dipping sauce, but really just the yellow part of the pie. This got me to thinking: what is that yellow stuff called? My first thought was meringue, but as it turns out, that's the white stuff on top! But it's not just lemon....hm.

I turned to Lord Google to investigate the name of that delicious yet elusive goo between the meringue and crust of these delectable pies. The answer? Fruit curd.

A la Lady Wikipedia, I learned that fruit curd is "a dessert spread and topping usually made with lemon, lime, orange or raspberry. The basic ingredients are beaten egg yolks, sugar, fruit juice and zest which are gently cooked together until thick and then allowed to cool." I was quite pleased to have learned a new word, but then I started wondering about Little Miss Muffet and her curds and whey.

The question was this: Why had I always imagined curds and whey to be something akin to very soggy, plain oatmeal? And if it tasted anything like fruit curd, then why the heck haven't I had it before?!

Back to Lady Wikipedia... "Curds are a dairy product obtained by curdling milk with rennet..." You know those chunks you get in your milk when it sours? Those are "natural curds." And what's rennet you ask? Well rennet is an enzyme produced in mammals' stomaches, and the rennet often used to make curds is gathered from cows. Now, I'm an adventurous eater, but this goes a bit beyond my tastes even. Plus my recipe called for neither milk nor rennet. So what makes a curd a curd then?

A bit more reading revealed this: fruit curd is similar to traditional curds in that it is the result of proteins being globbed together. In a fruit curd, eggs are substituted for milk. Since both are heavy in protein, both can be used to produce that gooey consistency. And instead of rennet, an acidic fruit juice is used. The acids work similarly to the rennet to cause those proteins to clump together.

And that's what I learned today! Now reward yourself with this delicious dessert:

---

Ricotta Fritters with Lemon Curd

Ingredients for Ricotta Fritters:

  • 4 large eggs
  • 1 teaspoon pure vanilla extract
  • 2 cups ricotta (about 1 pound)
  • 1/2 cup all-purpose flour
  • 1/2 cup sugar
  • 2 teaspoons baking powder
  • Corn or canola oil
  • Cinnamon
  • Brown sugar

Directions
  1. Beat the eggs, ricotta, and vanilla together in a large mixing bowl. Sift the flour, sugar, and baking powder on top, and fold the mixture together until it is a homogenous if not entirely smooth batter.
  2. Preheat the oven to 200 degrees. Bring 2 inches of oil to 375 degrees in a wide skillet. Add tablespoon-sized lumps of batter to the oil, working in batches as necessary to avoid crowding the pan. Fry the fritters for about 4 minutes, flipping them once mid-fry to ensure that each side turns a deep golden brown.
  3. Remove them to a paper towel-lined sheet pan and put the pan in the oven. Let the oil return to temperature (375 degrees) before you fry the next batch. Put your serving platter in the oven to warm before adding the last of the batter to the pan.
  4. Toss fritters in a bowl with some brown sugar and cinnamon to lightly coat them.

Ingredients for Lemon Curd:
  • 1 cup white sugar
  • 2 tablespoons all-purpose flour
  • 3 tablespoons cornstarch
  • 1/4 teaspoon salt
  • 1 1/2 cups water
  • 2 lemons, juiced
  • 1 lemon, zested
  • 2 tablespoons butter
  • 4 egg yolks, beaten
Directions:

  1. Preheat oven to 350 degrees F.
  2. In a medium saucepan, whisk together 1 cup sugar, flour, cornstarch, and salt. Stir in water, lemon juice and lemon zest. Cook over medium-high heat, stirring frequently, until mixture comes to a boil. Stir in butter.
  3. Place egg yolks in a small bowl and gradually whisk in 1/2 cup of hot sugar mixture.
  4. Whisk egg yolk mixture back into remaining sugar mixture. Bring to a boil and continue to cook while stirring constantly until thick. Remove from heat and let cool.

Original recipes can be found at Sunday Brunch and AllRecipes.

Seasonal Soups: Sweet and Spicy Gazpacho

"Cold soup is a very tricky thing, and it is the rare hostess who can carry it off. More often than not the dinner guest is left with the impression that had he only come a little earlier, he could have gotten it while it was still hot." -Fran Lebowitz


Ah, soup! Who can resist the first cheesy bite of French onion soup? Or how about the hearty aroma of minestrone? Have mercy on the kid who suffered a sick day without a sip of chicken noodle!

'Tis oft overlooked-
That kaleidoscopic group
Of foods we call 'soup.'

Karl had a brilliant idea recently- let's celebrate soup in all of its glory! Here's our goal: one year...four seasons...and twelve seasonal soups. And it begins with this post!

---

Sweet and Spicy Gazpacho

A gazpacho is a tomato-based soup, hailing from the southern region of Spain called Andalusia, containing raw vegetables and served cold. This particular gazpacho combines the sweet flavors of apple and cinnamon with the spicy kick of chili pepper and cayenne powder. The most difficult part of this recipe was waiting for the soup to cool before eating it! Or perhaps the realization that pureeing vegetables in a blender is considerably more difficult than in a food processor.

Ingredients:
  • 5 large ripe tomatoes
  • 2 medium red-skinned apples, quarted and seeded
  • 1 chili
  • 2 tbsp olive oil
  • 2 tsp fennel seeds, chopped
  • 1/2 tsp brown sugar
  • 1 leek, diced
  • 2 carrots, diced
  • 2 sticks of celery, diced
  • 4 cups vegetable stock
  • cinnamon, to taste
  • cayenne pepper, as desired
Directions:
  1. Pre-heat the oven to 350 deg F.
  2. Place the tomatoes, apple, and chili onto a baking tray, lightly drizzle with olive oil, and sprinkle with fennel seeds and brown sugar. Bake for 25-30 minutes until the tomatoes are beginning to brown and the apples soft. Remove from oven and cool.
  3. After they have cooled, pulse in a food processor (or blender) along with pan juices until smooth.
  4. Heat a tbsp of olive oil in a large pot. Fry the leeks over a medium heat for 2-3 minutes, then add the carrots and continue to cook for a further 3-4 minutes. (The carrots are going to retain their crunchiness.)
  5. Add the celery, stock, and pureed tomato mixture. Turn the heat up to high and bring the mixture to a gentle boil. Continue to simmer for 25-30 minutes, adding cinnamon to bring to desired sweetness. I would also recommend adding ~2 tsp cayenne pepper here to bring out the spiciness, but make sure to bring it to your desired heat.
  6. Soup can be eaten hot, but believe me- if you can wait long enough to serve it cold (as in make it a day early and refrigerate it overnight), it will be well worth it!
Special thanks to our guest chefs, Petra and Chelsea!


Let's Start a Food Revolution!

"Hungry men think the cook lazy."
-Anonymous

So think about this. When was the last time you went out to eat? What did you order? How much did you pay? Now ponder this: could you have made it yourself?

The sad truth is that most of us go out to eat because it's more convenient than doing the cooking ourselves, and then we end up paying an embarrassing amount of money for something pretty simple. CNNMoney.com reported in 2005 that an average meal in New York City runs $37.61! And San Francisco clocked in at a close second- $35.52! This point hit me pretty hard when I ordered a Buffalo Chicken Wrap from TGI Friday's a few weeks ago and ultimately paid $10 for what could have been a $3 meal.

Well enough is enough! I, for one, am sick of getting ripped off every time I eat out. So in honor of all of you readers who are smart enough to stay in and take the time to cook, here's an easy but delicious recipe.

Bon appetit!

---

Black and Bleu Lettuce Wraps

Ingredients:
  • lettuce leaves (4-6 large leaves will do)
  • 1 lb beef rounds
  • 2 1/2 tbsp cajun seasoning
  • 1 red bell pepper, julienned
  • 1 green bell pepper, julienned
  • 1 small red onion, julienned
  • 1 tbsp olive oil
  • 1 tbsp bleu cheese, crumbled (or more if you really like bleu cheese!)
Directions:
  1. Julienne vegetables and saute in olive oil over medium-high heat for 3-4 minutes or until tender and onions clear. Remove from heat and cool.
  2. Wash and separate lettuce leaves. Store in an airtight container and cool as well.
  3. Place rounds in a plastic bag and add cajun seasoning. Seal bag and tenderize meat liberally, making sure to cover the meat with the seasoning as you do so.
  4. Pan sear the rounds to desired doneness. Karl and I seared the rounds over a high heat for a couple of minutes on each side (flipping as little as possible). Remove rounds from heat and cut into thing slices (cutting against the grain).
  5. In each lettuce leaf, place a serving of sauteed vegetables, a few slices of beef, and some bleu cheese. Serve with bleu cheese dressing to dip!

Monday, May 17, 2010

Simple Sweets

"My friend asked me if I wanted a frozen banana. I said, 'No, but I want a regular banana later, so...yeah.'" -Mitch Hedberg

Bananas. There really is nothing like them. Packed with vitamins, the banana is nothing short of a super fruit. What vitamins, you ask?
  • Potassium! Did you know that if it weren't for potassium, our bodies wouldn't even function?! Seriously. The presence of potassium in our bodies is vital for neurons in our brain to communicate and for every muscle in your body to contract- even your heart.
  • Vitamin C! Our bodies need certain 'building blocks' in order to make things like collagen (connective tissue in the body) and neurotransmitters (the chemicals that brain cells use to communicate). Vitamin C is one of those essential building blocks. Plus it acts as an antioxidant- a molecule that works against the naturally occurring deterioration of our cells as they go through their day-to-day activities.
  • Fiber! Haven't had the pleasure of a healthy passing of stool lately? Perhaps your diet is too low in fiber. Not only does fiber promote regularity of your movements, it also regulates blood sugar, reduces appetite (by making you feel full faster), and reduces the risk of heart disease and diabetes.
  • Sodium, Fat, and Cholesterol! Just kidding. Not really. In fact, they don't contain any of these, meaning that a diet rich in bananas is great for reducing the risk of high blood pressure.
The long and short of it is that bananas are literally packed with nutrients and virtually no bad stuff. So...why the heck aren't people eating bananas more often?!

Oh yeah, that's probably why. Overripe bananas look gross, and most people don't enjoy walking the fine line between brown spotting and possible rotting. And while bananas tend to run among the cheaper of fruits, it can be disheartening (in my experience at least) to buy a bunch of bananas only to find that they brown too much before you can finish them off.

But wait! Don't throw those overripe bananas in the trash. Not when they can be turned (quite easily) into a delicious and healthy dessert. Mmm...dessert. Are you ready for this recipe? It's going to blow your mind:

---

Banana Ice Cream

Ingredients:
  • bananas (green/yellow to yellow/brown)
Directions:
  1. Freeze bananas in a zip-lock bag until they are completely frozen.
  2. Place bananas in a blender or food processor and pulse-blend, mixing occasionally to push solid chunks towards the blades. You'll notice that as the banana continues to blend, it will take on a creamy, smooth texture (like ice cream). Blend until banana is as smooth (or chunky) as you want.
  3. Leftovers can be frozen and enjoyed later :)
---

Bingo, bango. That was easy! And I'm telling you- this stuff is delicious. Plus, you can mix in whatever you want and create your own ice cream flavor. Karl and I added strawberry pulp that was leftover from our Aguas Frescas (recipe after the jump), but on my next few batches, I plan to add things like honey, chocolate chips, or peanut butter.

Now make some ice cream and go lie in the sun. It's spring, for pete's sake!

---

Aguas Frescas
(makes just over a quart)

Ingredients
  • 1 lb strawberries, washed, green cut away
  • 4 cups cold water
  • 1/4 tsp vanilla extract (or coconut extract)
  • 2 tbsp lime juice
  • 2 tbsp sugar
  • Ice
Directions
  1. Combine strawberries, 2 cups of the water, and extract in a blender and liquify.
  2. Strain the mixture using a sieve (or a pair of pantyhose if you're feeling as ghetto as Karl and I were).
  3. Add remaining water, lime juice, and sugar and mix.
  4. Serve over ice.
Everyone likes their aguas frescas a little differently, so feel free to tweak the ingredient amounts to fit your taste. I went so far as to add a few healthy gobs of honey to my glass :)

Thursday, May 13, 2010

My Muse, the Artichoke

"These things are just plain annoying. After all the trouble you go to, you get about as much actual 'food' out of eating an artichoke as you would from licking 30 or 40 postage stamps. Have the shrimp cocktail instead." -Miss Piggy

Oh, Miss Piggy. Yes- I would agree that, as far as veggies go, artichokes rank among the more arduous, but do not be discouraged! After a bit of recipe experimentation, Karl and I have discovered that these little babies (pun very much intended) are absolutely worth the effort.

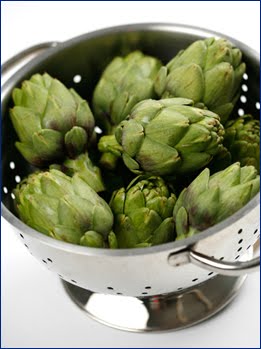
Artichoke season runs from March to May, so if you want them fresh, check the produce section ASAP. But thankfully, artichokes are typically jarred in a marinade, so you could probably find them any time of the year. I stumbled upon a case of 9 baby artichokes while perusing the produce last weekend and picked them up with the intention of finding something to do with them. Seriously- I have never cooked a fresh artichoke before!

That said, Karl and I spent the evening perusing recipes and trying to figure out how exactly one even cooks an artichoke. And as it turns out, they're really not so difficult. The recipe that we came up with is pretty much an original piece of work- the only thing that's not our own is the Hollandaise sauce. Let us know what you guys think! We want to perfect the recipe, and the more people that give us feedback, the better it can become! :)

Thanks for reading and happy cooking!

---

Spring Sausage and Artichoke Saute with a Hollandaise Sauce
(serves 2-3)

Ingredients:
  • Italian sausage (4 logs)
  • 1 tbsp butter
  • 2 cloves garlic, chopped
  • 1/2 large yellow onion, chopped
  • 1 red bell pepper, chopped
  • 1 yellow bell pepper, chopped
  • 9 baby artichokes, washed
  • 1 tsp fennel seed
  • 3 tsp thyme
  • 2 lemons
  • 4 leaves basil, rolled and chopped
  • salt and pepper, for taste
For Hollandaise sauce
  • 4 egg yolks
  • 1 lemon
  • 1/2 c unsalted butter (melted)
  • 1 tsp cayenne pepper
  • salt and pepper, for taste
Directions:
  1. Start cooking your sausage early! In a lightly greased, non-stick frying pan, saute the sausage over low heat. Cooking it like this takes anywhere from 1 to 1 1/2 hours, but the sausage won't dry out and will retain most of its flavor. Turn the sausage occasionally (every ten minutes will do).
  2. Prep the artichokes as described below.
  3. In a large frying pan over medium-low heat, melt 1 tbsp butter. Once butter has just melted, add chopped garlic and saute 1 min, moving constantly. Add onions and cook 1 min. Add chopped red and yellow bell peppers, artichokes, fennel seed, thyme, juice from second lemon, and chopped basil. Add a bit of salt and pepper here to taste, but remember that the Hollandaise sauce will be eaten over the vegetables, so don't salt too much! Continue to saute vegetables until tender.
  4. Whisk the egg yolks and lemon juice together in a stainless steel bowl until it has thickened and doubled in volume. Place the bowl over a saucepan with simmering water, but don't let the water touch the bottom of the bowl. (It's important that the egg not get too hot or they will begin to scramble!) Continue whisking the mixture and slowly add the melted butter. Whisk the mixture until it has thickened and doubled in volume. Remove from the heat, whisk in cayenne, salt, and pepper, and keep in a warm place until ready to use.
  5. Once the sausage has finished cooking (no more pink inside), cut it into bite sized pieces and add it to the vegetables, stirring and sauteing over low heat. Allow the sausage and veggies to saute together for about 10 minutes.
Karl and I served the sausage and vegetables with the Hollandaise sauce drizzled over the top. As an appetizer, we had red wine-soaked goat cheese on toast and Pinot Grigio. If you go all out and get the goat cheese, add a bit of cheese and chopped basil as a garnish!

---

Artichoke Prep*:

  • Bend back outer petals, snapping them off at the base.
  • Continue snapping off petals until the leaves are half green (at the top) and half yellow.
  • Using a stainless steel knife, cut the top cone of the leaves at the point where the yellow meets the green.
  • Cut the stem level with the base and trim any remaining green from the base of the artichoke.
  • Plunge artichoke hearts into acidified water. (A quart of water with 1 lemon's juice.)
  • Chop hearts into halves or quarters before sauteing.

  • *Artichoke preparation courtesy of the California Artichoke Advisory Board.

    Sunday, May 9, 2010

    Mother's Day Meal

    “Every year the number of new cookbooks increases, but in spite of them the progress made in this most useful of the arts is not ever overpowering. On the contrary, we must regretfully admit that nowadays people no longer prepare the fine and nourishing dishes that our mothers used to make.” -Anna Dorn, Cookbook Author (1834)

    First up...

    Happy Mothers Day, Mom! I wouldn't be the man I am without you. I love you!

    ---

    OK, so anyhow. I am very proud and excited to say that New Chefs has gotten our first request! It reads as follows...

    BlondiePicPic writes: You guys are so cute. Can you tackle a good veg-friendly recipie next? I have yet to master the art of cooking tofu properly. Teach me Chef Shawnay!

    Well, I was perusing the produce aisle this evening and, perhaps it was because of Mothers Day, but I found myself remembering when my grandma (Nana) would make bell peppers stuffed with red rice. As I passed the red bell peppers, they screamed to me: "Stuff us! Stuff us!" Okay, that's weird. They didn't.

    But I did decide to experiment with the stuffed bell pepper idea. I ended up stuffing the peppers with cous-cous and roasting it on the grill, but the recipe after the jump will work in an oven just fine. We ate them alongside grilled chicken (the delicious marinade recipe is here as well) and a salad with guacamole and tomatoes. Yummo!

    So there you go, BlondiePicPic. Let us know what you think!

    ---

    Cous-Cous Stuffed Red Bell Peppers

    • one box cous-cous (cooked)
    • 1 tbsp olive oil
    • 1 clove garlic (chopped)
    • 2-3 tbsp onion (chopped)
    • 1/2 c feta cheese
    • 2 large red bell peppers
    • salt and pepper to taste
    1. Preheat oven to 350 F. Cook cous-cous according to box directions. (Sorry I haven't gotten a more from-scratch way of making cous-cous, but look for this box at the store.)
    2. In a saucepan over medium heat, saute the oil, garlic, and onions for ~1 min. Add a pinch of salt and pepper here as desired.
    3. Mix garlic, onions, and feta cheese into cous-cous.
    4. Cut around top of bell pepper and remove. Cut away inner seeds and white parts of the vegetable. Rinsing with cold water in the sink is useful for getting all of the seeds away.
    5. Stuff the peppers with the cous-cous mixture, making sure to push it in until the peppers are nice and full. Return the tops of the peppers to close them up.
    6. Wipe the outside of the peppers lightly with olive oil. I'd suggest dabbing a paper towel with ~1 tbsp of olive oil so you don't get it all over your hands.
    7. Wrap the peppers in tin foil and place on a cookie sheet in the oven. Cook for 40-50 mins or until the peppers are cooked through as desired.
    ---

    Honey Soy Marinade

    Per 1-2 lbs skinless, boneless chicken:

    • 3 tbsp soy sauce
    • 1/2 c water
    • 1 tbsp honey
    • 1 green onion, chopped*
    • 1 tsp lime juice
    • 1 tbsp white wine
    Mix ingredients and place in a large, shallow bowl over chicken. Cover bowl tightly and refrigerate 1-6 hours before cooking.

    *In case you've never been told (because Karl and I hadn't until recently), when a recipe calls for green onions, use the root end of the onions- not the greens! Don't worry...this is a common mistake!